
I decided on Astro 🔗 as the best fit for my personal blog; it’s simple to use and author with, as it is written in MDX. Primarily, it creates a static site that can be published, making it lightweight to host and fast.
Recently, I moved all of my DNS management to Cloudflare and wanted to make further use of it, having invested time in setting it up. This led me to discover Cloudflare Workers, which are a free hosting option included in the free plan.
Now, what problem was I trying to solve?
I want to be able to write my blogs whenever I wish, which sometimes means more than one in a day, one a week, or even one a month. However, I want to automate the publishing of them, as I could if I had used something like WordPress.
What solution did I come up with?
A key element was that the solution had to be free, or at least as inexpensive as possible. I also wanted to avoid hosting it myself in my homelab, as that would then become a ‘production’ service. I came up with the following:
- Write blog posts in MDX and push to GitHub with the publish datetime set in the future in the metadata.
- Run a daily GitHub Action to commit to the site’s repository.
- Cloudflare Worker watches for new commits on GitHub and updates the site.
- Zapier monitors the site’s RSS feed and pushes new posts into Buffer 🔗 to publish to LinkedIn.
- Check and update posts in Buffer and allow them to auto-publish to LinkedIn.
- Share on LinkedIn.

Step 1
The first step is to write the blog posts in MDX and push them to GitHub. There are required fields in the metadata for the blog files, including ‘pubDatetime’.
---
title: Automating Astro Builds and Deployments
slug: automating-astro
pubDatetime: 2025-10-03T00:00:00
description: A guide on how I have automated the build and deployment of my Astro site using GitHub Actions, Zapier and Cloudflare.
draft: false
tags: [development, astro, automation, github, cloudflare]
heroImage: ../../assets/images/AstroAutomation.png
ogImage: ../../assets/images/AstroAutomation.png
---
Step 2
Next, there is the GitHub Action that runs daily to add a commit to the site, which Cloudflare looks for. This could potentially be done more efficiently, but for now it works as I need.
name: Daily Auto Rebuild

on:
  schedule:
    - cron: '0 7 * * *' # 8 AM UK time (7 AM UTC)
  workflow_dispatch:

jobs:
  trigger-rebuild:
    runs-on: ubuntu-latest
    steps:
      - name: Checkout repo
        uses: actions/checkout@v4

      - name: Create empty commit
        run: |
          git config user.name "GitHub Actions"
          git config user.email "actions@github.com"
          git commit --allow-empty -m "chore: trigger rebuild"
          git push

      - name: Wait for site to build
        run: sleep 300 # Wait 5 minutes (300 seconds)


      - name: Extract latest post URL from RSS
        id: get_post_url
        run: |
          RSS_URL="https://matthewthomas.cloud/rss.xml"
          POST_URL=$(curl -s "$RSS_URL" | awk 'BEGIN{RS="<item>"} NR==2 {match($0, /<link>([^<]+)<\/link>/, a); print a[1]}' )
          echo "Latest post URL: $POST_URL"
          echo "post_url=$POST_URL" >> $GITHUB_OUTPUT

      - name: Ping LinkedIn Post Inspector
        run: |
          curl -s "https://www.linkedin.com/post-inspector/inspect?url=${{ steps.get_post_url.outputs.post_url }}"
As you can see this adds a daily chore commit. Additionally I have added a step to put the blog post URL through the LinkedIn Post Inspector. This step might be redundant, but I found that sometimes LinkedIn would not pick up the OG image. As you can see, this adds a daily chore commit. Additionally, I have added a step to put the blog post URL through the LinkedIn Post Inspector. This step might be redundant, but I found that sometimes LinkedIn would not pick up the OG image.
Step 3
The Cloudflare Worker connected to the repository is looking for new commits to then trigger a new build.
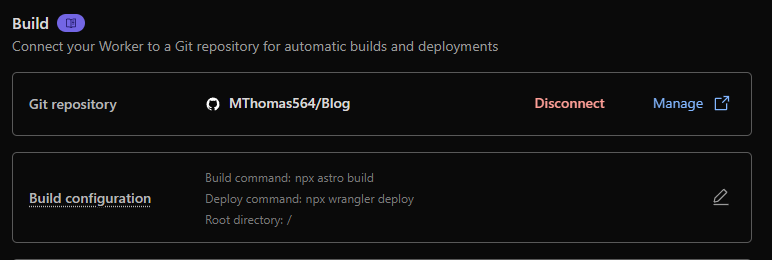
When it sees a new commit, it will pull the latest code and then build the site using the following commands:
Build:
npx astro buildDeploy:
npx wrangler deployStep 4
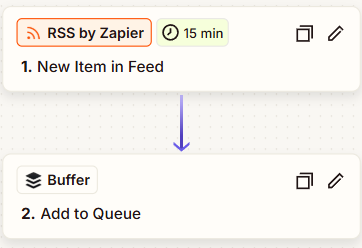
Next, I have a simple Zapier workflow that monitors my RSS feed every 15 minutes to look for new posts. When found, it automatically adds them to Buffer.
Step 5
The final automation step is in Buffer, a useful social media management tool. Now, do I really need to use one? Probably not; I was kind of forced to by wanting to automate the LinkedIn posting. I tried to do it via Zapier directly, but the quality of the post created was very poor, unless I paid for subscriptions.
I found Buffer to be a good compromise. I can automate posts through this workflow, then manage the posts in Buffer to make any changes or updates before they are published. I can also use it to schedule any other posts I may want to share outside of blog posts.
Step 6
Lastly, the post gets shared on LinkedIn. This is something I have only started doing with this blog, but I want to share my work and thoughts more widely.
This is taking some learning, especially with how the LinkedIn algorithm works, but I am starting to get a feel for it.
Conclusion
Overall, I am really happy with how this setup works for me. I couldn’t find any existing solutions online that worked for me, so creating my own was the best option.
It could probably be simplified in some places, but it hits the key points:
- Free or very low cost
- No hosting required
- Fully automated
- Easy to write and publish blogs
I’d be interested to hear if this works for anyone else, or if you have any suggestions as to how to improve it.