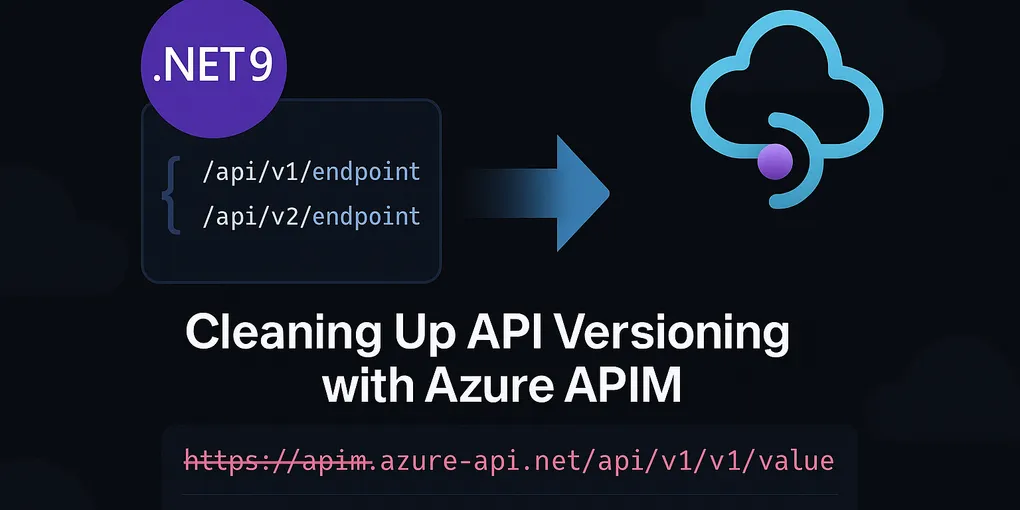
When writing an API in .NET, it’s common to be able to have multiple versions of your API. This functionality is built into .NET, allowing you to specify different versions of your API endpoints. Azure API Management (APIM) is a great tool to create an API hub, especially when it comes to managing multiple versions of your API.
However, when you want to set this up you can run into some issues, especially if you want your API to have versioning in the URL. Whilst you can handle the versioning in the URL, a header or query parameters, in the URL is my preferred option.
When this is set up in both the API and APIM you can end up with some URLs like the following:
https://apim.azure-api.net/api/v1/v1/value
This is pretty poor really, but why does it happen?
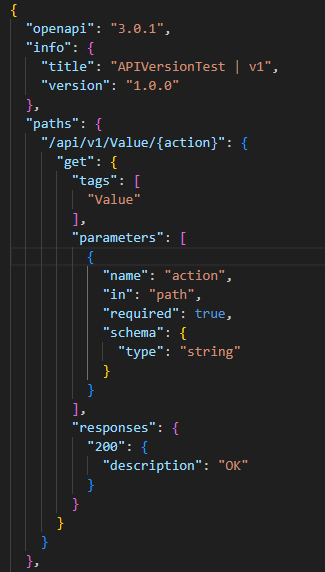
Firstly, the OpenAPI file that has been generated by the API has the version in the path as you would expect as that is how we are managing the version selection.
And then we have the version in APIM, which is required when you enable versioning on the API settings.

How can this be fixed?
Update the API project
To start with we need to make some changes in our .NET project. For reference, the project I am using to demonstrate is .NET 9 and uses the following packages:
<PackageReference Include="Asp.Versioning.Mvc" Version="8.1.0" />
<PackageReference Include="Asp.Versioning.Mvc.ApiExplorer" Version="8.1.0" />
<PackageReference Include="Microsoft.AspNetCore.OpenApi" Version="9.0.7" />
<PackageReference Include="Microsoft.Extensions.ApiDescription.Server" Version="9.0.7">
    <IncludeAssets>runtime; build; native; contentfiles; analyzers; buildtransitive</IncludeAssets>
    <PrivateAssets>all</PrivateAssets>
</PackageReference>
I have shared this project here on Github 🔗
Step 1 - Set up the Program.cs to have API Versioning
builder.Services.AddApiVersioning(options =>
{
options.DefaultApiVersion = new ApiVersion(1);
options.AssumeDefaultVersionWhenUnspecified = true;
options.ReportApiVersions = true;
})
.AddMvc()
.AddApiExplorer(options =>
{
options.GroupNameFormat = "'v'VVV";
options.SubstituteApiVersionInUrl = false;
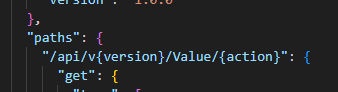
});The key thing to note here is options.SubstituteApiVersionInUrl = false. This prevents the version being set in the OpenAPI file, leaving it like this:
Step 2 - Create an OpenApiDocumentTransformer
A document transformer can be used to customise the output which OpenAPI generates, allowing both the removal of properties but also the addition of custom ones if needed.
public class OpenAPIPathTransform : IOpenApiDocumentTransformer
{
    public Task TransformAsync(OpenApiDocument document, OpenApiDocumentTransformerContext context, CancellationToken cancellationToken)
    {
        var newPaths = new OpenApiPaths();
        foreach (var path in document.Paths)
        {
            // Remove '/api/v{version}' from the path
            var newPath = Regex.Replace(path.Key, @"/api/v\{version\}", "", RegexOptions.IgnoreCase);
            var pathItem = path.Value;

            // Remove 'version' path parameter from all operations if present
            foreach (var operation in pathItem.Operations.Values)
            {
                if (operation.Parameters != null)
                {
                    operation.Parameters = operation.Parameters
                        .Where(p => !(p.In == ParameterLocation.Path && p.Name == "version"))
                        .ToList();
                }
            }

            newPaths.Add(newPath, pathItem);
        }

        document.Paths = newPaths;

        // Set the OpenAPI info.version property based on the document name
        if (!string.IsNullOrEmpty(context.DocumentName))
        {
            document.Info.Version = context.DocumentName;
        }
        return Task.CompletedTask;
    }
}
This has a few parts to it:
- Remove the API version from the path.
- Remove the version parameter from the operations, otherwise the spec is invalid.
- Set the version property to have the version from the document name that we will set in the Program.cs
Step 3 - Register the OpenAPI Generation and document transformer in the Program.cs
Next we need to register the fact that we want to generate OpenAPI files for the API, and the versions these are for. With that we register the document transformer.
builder.Services.AddOpenApi("v1", options =>
{
    options.AddDocumentTransformer<OpenAPIPathTransform>();
});
builder.Services.AddOpenApi("v2", options =>
{
    options.AddDocumentTransformer<OpenAPIPathTransform>();
});
Here we set our two versions, and register the document transformer so it updates the spec file to have the properties we want, and, importantly, the path.
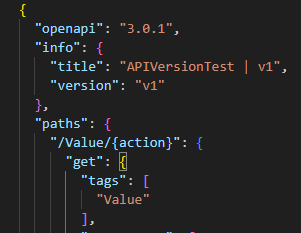
Now our API spec file looks like this:
Update APIM
I am not covering the full steps of setting up an API in APIM here, just the steps important to what I am demonstrating.
Step 1 - Create a new API in APIM
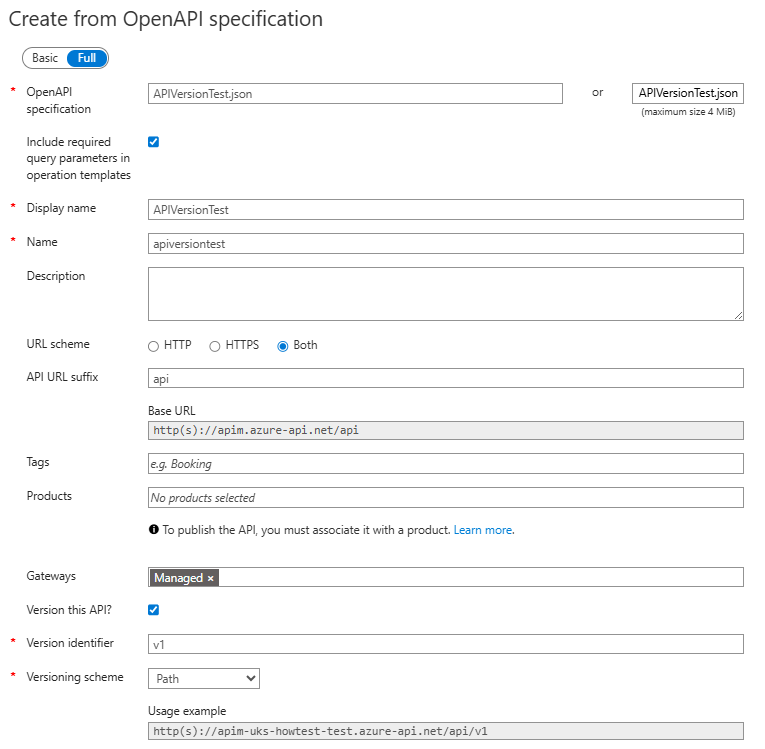 In this example I am creating from an OpenAPI spec file which I have locally created by the project.
The key things are the settings for this project is the API URL suffix which is set to api. And then the enabling of versioning, with the correct identifier and the scheme of path.
When we look at the test API for one of our endpoints we see a request URL of https://apim.azure-api.net/api/v1/Value
Perfect, right? Not quite…
Step 2 - Update the policy
Whilst the request here looks right, the /api/v1 only really relates to the routing within APIM itself. We need to update the backend call to include this too so we get to the right endpoints, and the right version.
This is the inbound portion of my APIM policy:
<inbound>
    <base />
    <set-backend-service backend-id="ap-apimtest" />
    <rewrite-uri template="@{ return "/api/v1/" + context.Operation.UrlTemplate; }" />
</inbound>
This firstly sets the backend to be pointing to my API backend. And then it rewrites the URL that is used to call the backend to include /api/v1 as we need. Then it appends the operation we are calling so we get the right thing.
That’s it!
There are quite a few steps to doing it this way, and there might be some other ways of doing it. That being said, I have not found any good pieces of documentation for how to do it, specifically for this kind of setup with the versioning in the URL.
Please reach out if you have other ways to do it!